
Setting up DuckDNS on your Raspberry Pi is a great way to automatically update your external IP address. Allowing you to host services in your network. What is DuckDNS? well, it’s a way to automatically update a name server (in this case, DuckDNS) in real time with your external IP address.
Most home and small business internet connections have a dynamic IP address, which means it never stays the same, your address will most likely change when your router has been restarted, but usually, all service providers change the address after a set amount of time.
Now because your address keeps changing it makes it very hard to connect to your network (via a VPN) for example, as connectivity will be lost when your IP address changes meaning that they would have to be reconfigured each time this happens.
DDNS or Dynamically Assigned Domain Name resolves this, by updating your dynamically assigned IP address with a Domain name, so that you only have to remember the DDNS name, for example (mydomain.duckdns.org) rather than the ever-changing IP address.
So you could set up a Wireguard VPN server and point this to your mydomain.duckdns.org name and your connection would always resolve back to your external IP address even when it changes.
Before you start the setup tutorial, ensure that you have set up a DuckDNS account, or go to DuckDNS and set up an account, it’s free and really simple to do.
You will need your newly created domain name and token created at Duckdns to set up the DDNS service on your raspberry pi.
Setting up DuckDNS On Your Raspberry Pi is quite simple. To set up the DuckDNS service
SSH into your Raspberry Pi you will need to make a directory to hold a file that will run at a scheduled time, this will be used in the later steps.
Type the commands followed by the enter key, one by one below
mkdir duckdns
cd duckdns
nano duck.sh
We’re now going to place a script in this file that will run at a scheduled interval. The script needs to have the domains you are using (from DuckDNS) added to it.
nano (the chosen text editor, in this case, will now be open, all you need to do is copy the text below into the text editor (Change YOUR_DOMAIN and YOUR_TOKEN) to the domain name and token that was created on your DuckDNS account.
echo url="https://www.duckdns.org/update?domains=[YOUR_DOMAIN]&token=[YOUR_TOKEN]&ip=" | curl -k -o ~/duckdns/duck.log -K -To save the file press Control and X to save the file, then press Y to confirm the change.
We now need to change the permissions of these files and access crontab to schedule this script to run every five minutes. Crontab is a task schedular that automates certain commands.
chmod 700 duck.sh
crontab -e
Paste the contents of the file below into the crontab file.
*/5 * * * * ~/duckdns/duck.sh >/dev/null 2>&1To save the file press Control and X to save the file, then press Y to confirm the change. The job will now run every five minutes. so let’s test it, and assuming it works, start the cron service.
If you receive OK after running this command, the process worked properly. If however, you receive KO, you have an error somewhere in your script file or you did not give the file the proper permissions.
./duck.sh
cat duck.log
sudo service cron start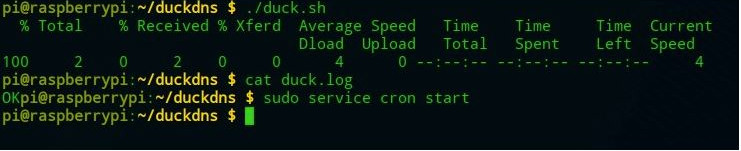
This is quite a straightforward process and allows you to use your newly created DuckDNS domain name to access services on your home or small business network using your dynamically assigned IP Address.

Leave a Comment